Free crochet patterns, ideas, tutorials, and a few recipes just for kicks and giggles
Monday, August 27, 2012
Crochet Pattern: Delicate Flower Motif
Delicate Flower Motif: Free Crochet Pattern
copyright 2012 by Cynthia J Luciene aka anitalite
Finished Size Larger Motif: 2 7/8"
Finished Size Smaller Motif: 1 1/4"
Materials:
size 10 thread in colors of your choice. I used pink for the color A and green for the color B.
size 6 steel crochet hook
large eyed needle for weaving in ends
Special Stitches:
TrTrCluster; (following ch 4) yo twice, insert hook into next st, yo, draw through st, (yo, draw through two loops) twice, *yo twice, insert hook into same stitch, yo, draw through stitch, (yo, draw through 2 loops on hook) twice, repeat from * once more, yo, draw through all 4 loops on hook. TrTrCluster made.
(It's easier than it sounds)
Tri-picot: (ch3, sl st in 3rd ch from hook)3 times, sl st into top loop and front post of sc just worked (previous to tri-picot) to close picot.
Instructions:
Using color A (pink), ch 7, join with sl st to form ring
Round 1: ch 1, 16 sc inside ring, join to first sc with sl st
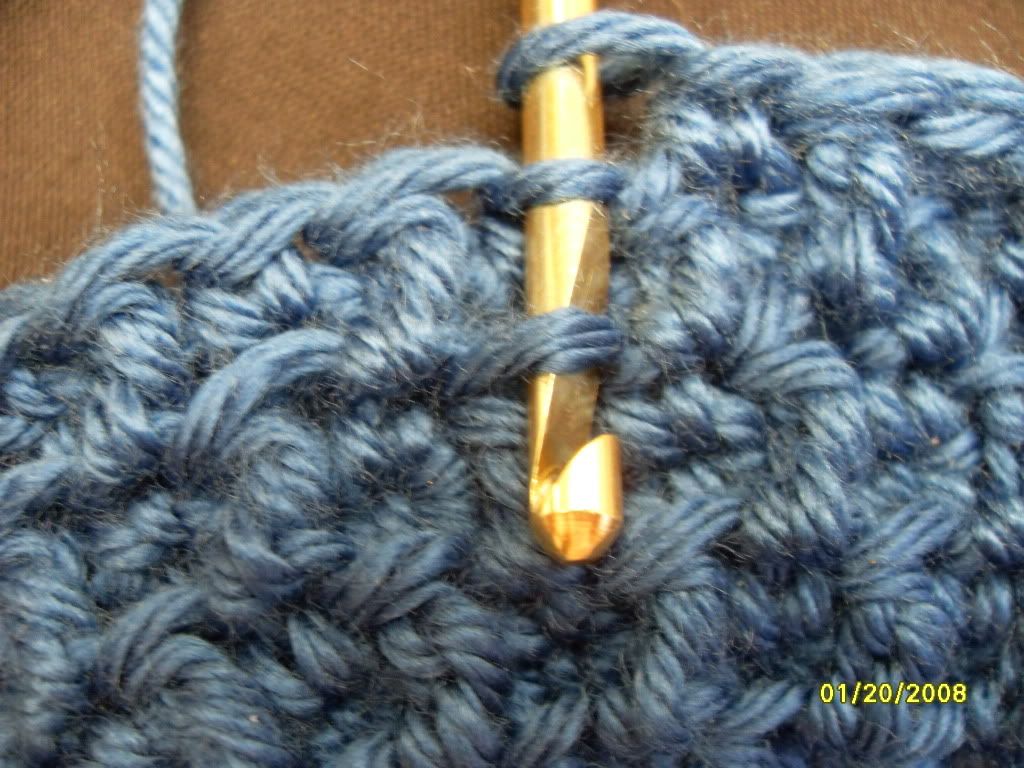
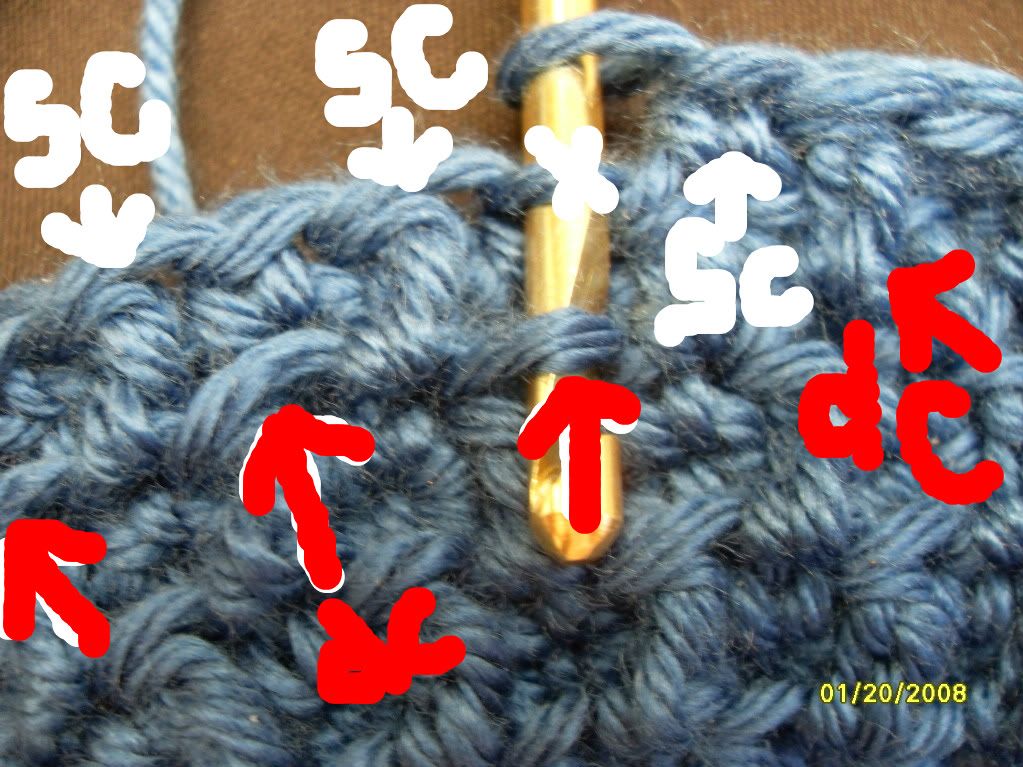
Round 2: ch 1, sc in same st; *ch 4, TrTrCluster in next st, ch 4, sc in next stitch; repeat from * 8 times; after last ch 4, sl st to beg sc to join.
Fasten off, weave in ends with large-eyed needle
Attach color B (green) at top of any petal with sc, (ch 7, sc in top of next petal) 8 times - at last ch 7, sl st into top of first sc to join.
Round 2: sl st into ch 7 loop, ch 1, (12 sc inside ch 7 loop) 8 times.
Round 3: sl st in next two sc (first two sc of next 12 sc group) ch 1, *sc in next 4 sc, tri-picot, sc in next 4 sc, ch 4, skip 4 sc (last 2 of same 12 sc group, first 2 of next 12 sc group); repeat from * around, ending with sl st into first sc made of this round.
Fasten off, weave in ends.
Space filler motif: (smaller motif - optional)
With color A, ch 4, join with sl st to form ring.
Round 1: 8 sc inside ring, join with sl st
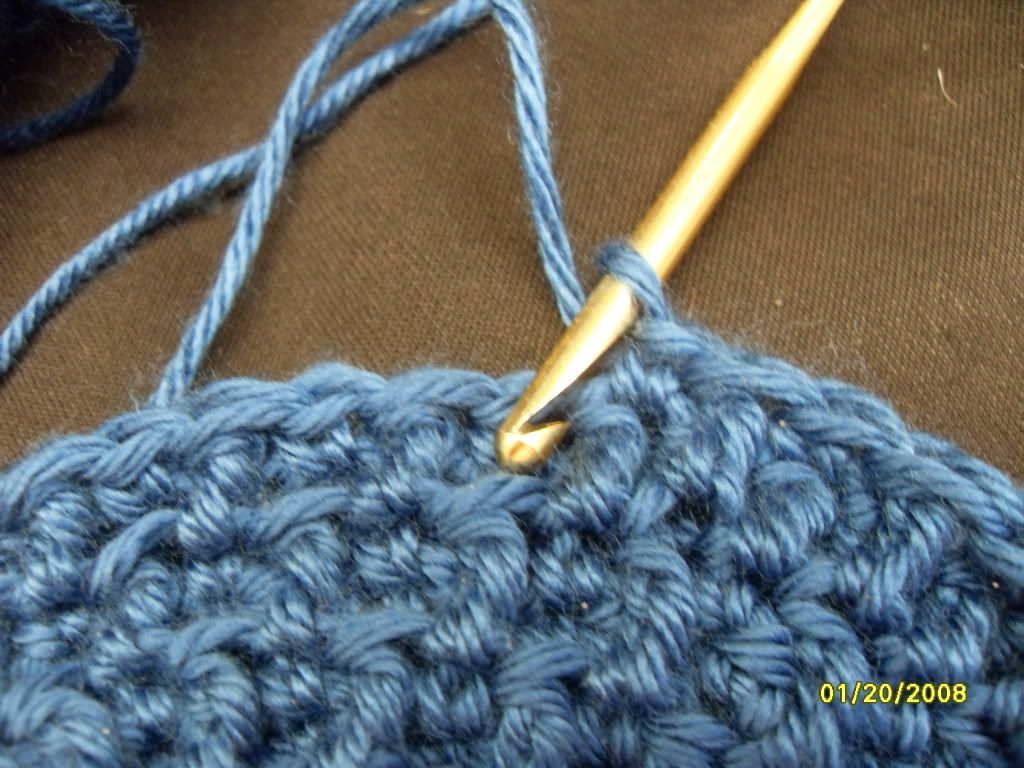
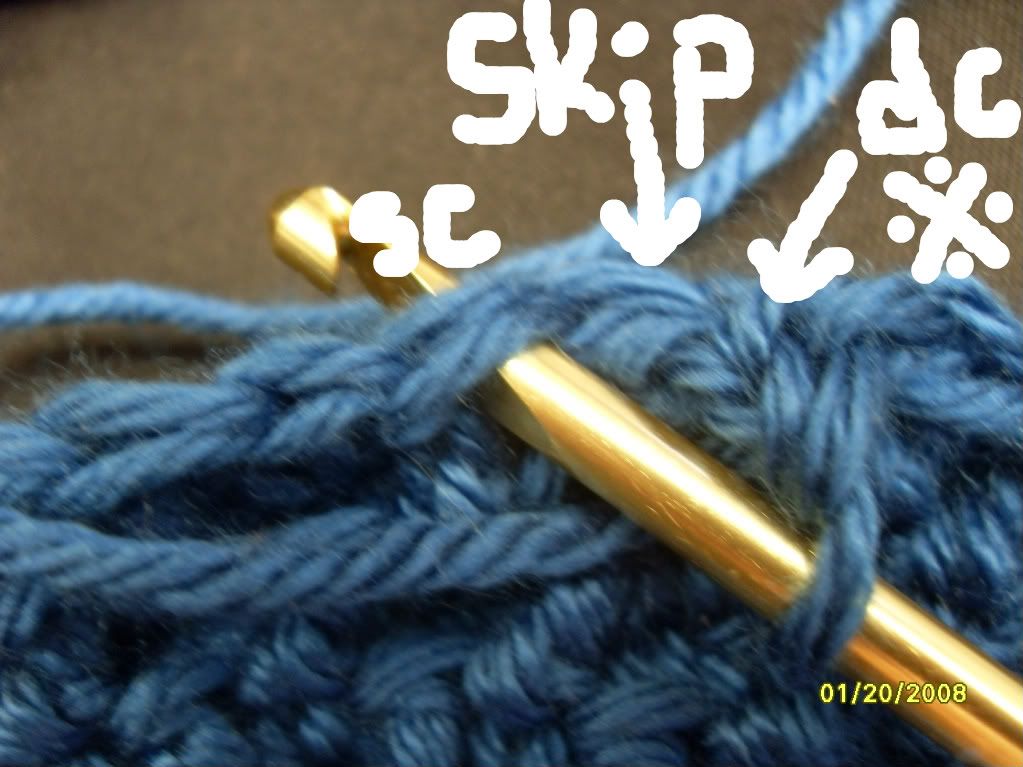
Round 2: ch 1, sc in same as ch 1, *ch 2, dc-cluster in next st, ch 2, sc in next; repeat from * around, ending with sl st in first sc made. Fasten off, weave in ends.
Attach color B to top of any petal with sc
Round 1: *ch 5, sc in next sc, ch 5, sc in top of next petal; repeat from * around (8 ch 5 loops); join last ch 5 to first sc with sl st
Round 2: sl st into next ch 5 loop, 6 sc in each ch 5 loop around, sl st to first sc to join
Fasten off, weave in ends.
Use this smaller motif to fill in spaces as you sew work together, if desired, depending on how you choose to put the larger motifs together. It can be done in several ways, experiment and see which way you like best:
Thursday, August 16, 2012
Crochet Pattern: Tuxedo Baby Bib
This is what I did today in a matter of about half an hour. This is my boyfriend's niece's baby, what a cutie pie he is. He makes a great model, far better than the stuffed pig I was going to use. lol...
Crochet Pattern: Tuxedo Shirt Baby Bib
copyright 2012 by Cynthia J Luciene
Pattern Notes: ch 3 at beginning of row counts as first dc for that row so you will skip making a dc in the very first stitch in the row (because the ch 3 is your first stitch) except in the first rows where you are increasing or working sc.
Body of bib:
Start with white Lily's Sugar And Cream 100% cotton yarn (worsted weight) or another cotton yarn of the same weight (category 4).
Using an H hook, ch 17.
Row 1: sc in 2nd ch from hook and in each rem chain; turn (16 sc)
Row 2: Ch 3 (counts as dc), dc in same st as turning ch, dc in next 2 sc, FPDC in next sc, dc in next 2 sc, FPDC in next sc, dc in next 3 sc, FPDC in next sc, dc in next 2 sc, FPDC in next sc, dc in next 2 sc, 2 dc in last sc; turn
Row 3: Ch 3, dc in same as turning ch, dc in each dc, BPDC in each FPDC, 2dc in top of turning ch 3; turn
Rows 4-5: Follow stitch pattern for rows 2, 3 increasing by 1 dc at beginning and 1 dc at end of each row. (DC in each DC, BPDC in each FPDC, FPDC in each BPDC.
Rows 6-13: Work even as follows: ch 3 (counts as first dc) dc in each dc, BPDC in each FPDC; turn, ch 3, dc in each dc, FPDC in each BPDC. Don't forget to make a DC in the top of the ch 3 turning ch which is counting as the first DC of the row. This keeps the edges smooth instead of bumpy.
(Do not fasten off)
Shoulders:
(RS facing, shoulder on the right)
Rows 1, 2: ch 3, dc in next 5 dc, turn
Rows 3-5 ch 1, sc in each st across - do not skip the first st as you did when ch 3 was a dc. (6 sc in each row). On last row of sc, do not turn but ch 52 for tie. Fasten off.
(RS facing, this will be for shoulder on the left)
Rows 1, 2 (Attach to the top of the ch 3 from row 13 of body of bib with a tight sl st) ch 3 (counts as first dc) dc in next 5 dc, turn
Rows 3-5: ch 1, sc in EACH dc (do not skip first st), turn
(Do not fasten off)
Chain 52, fasten off, weave in all ends.
Edging: Attach white to upper left shoulder of bib with a sc, sc evenly in ends of rows and in unused loops of the beginning ch 17, and up the other side in ends of rows. This will give the bib a nice finished look around the edges. Fasten off, weave in ends.
Bow Tie:
With black, ch 6
Making all of the following stitches inside the first ch (6th chain from hook):
3DTRC, ch 6, sl st, ch 6, 3 DTRC, ch 6, sl st.
Holding bow tie horizontally, sc around middle of tie to accentuate the "knot" a bit. Leave ends long so you have plenty to tie the bow to the bib and weave in ends so there's no chance of bow coming off of bib and creating a choking hazard.
Buttons:
Using black and a yarn needle, make buttons down front of bib, underneath the bow with a satin stitch. You can also use real buttons but I wouldn't recommend it because they are a potential choking hazard.
You may sell anything you make using this pattern but you may not sell the pattern. You can freely distribute the pattern by using a link back to this page only. If you make and distribute hard copies of this pattern please be sure to include this blog Name and Web Address on the paper copies and print this page in it's entirety: *Cynthia's Cynfully Spiffy Stuff http://anitalite.blogspot.com* Thank you and enjoy!
copyright 2012 by Cynthia J Luciene
Monday, August 6, 2012
Jade Textured Fat Bottom Bag
In the previous post I ranted on and whined about having to sell the house I've lived in for 52 years, and said I had to put crocheting on the back burner. Well, somehow I found time to crochet and found it to be very relaxing and fulfilling.
Instead of crocheting night and day I decided that I had to set aside some time for myself everyday to do what makes me feel good. With that goal in mind I managed to squeeze in enough time to (almost) finish another Fat Bottom Bag. I am pretty proud of this one, if I do say so myself. I was afraid the lining wouldn't go with the yarn well enough but it does the job as far as matching, well, blending with the yarn and adds a twist to the semi-rugged looking textured yarn that I used:
Handles purchased against my will at Joann's for about $7.00.
Yarn, purchased at Joann's for $9.99 per skein and I used 2 skeins.
Lining also purchased at Joann's was only a couple bucks.
When you add it all up, selling the bag for $60 barely covers the cost of materials and definitely doesn't leave much for all my laborious hours of crocheting and sewing spent on this project. I think I'd have to charge $80 for this bag and others like it that I use the expensive Red Heart Boutique Changes yarn. (This one in the color Jade). Especially if I use the expensive store bought handles. I had these handles on hand, I wouldn't have gone out to purchase them for this bag - I could have crocheted a nice set of handles that would have been just fine, as I did for the Grey Textured Fat Bottom Bag in a previous post. I had plenty of yarn left over to make handles but this bag happens to be for a friend whose favorite color is green and I wanted it to be especially nice for her as she's a specially lovely lady.
You're seeing photos below of a bag not quite done yet but I couldn't wait to post the bag; as I said, I'm pretty proud of this one. What do you think? Should I add an embellishment to the outside like a flower or bow or should I leave it as is, leaving it up to the beautiful textured yarn to be decorative enough on it's own? Leave me a comment below and I'd surely appreciate your input. ;-)
The handles aren't attached yet so they look cock-eyed. lol (Lining below)
My stupid camera decides what colors things will be, not the objects that I'm shooting. I don't know enough about digital cameras to adjust the lighting settings and all that stuff. One of these days.. Anyway, the lining is much more green than it appears here, and so is the yarn for the bag, for that matter. It is a deep, lightly dark shade of jade and the sparkly yarn in this skein is tinted green as well and it all blends beautifully together.
So - let me know what you think: Embellishment or no embellishment. If you think it needs something to spruce up the outside of the bag, what do you think would work well with all that texture? There's a solidish ribbon, the metallic yarn, a heavier fuzzy yarn, a boulce', and others that make up the textures in the yarn.
Tuesday, July 17, 2012
Crochet Tip: Using Your Machine To Sew Fabric To Your Crochet Project
If you're like me you spend a lot of time trying to figure out an easier, faster way of doing things that bore you. Don't get me wrong, I love to crochet and I love to sew - on the machine - hand sewing is not my favorite, or fastest thing to do. It takes me what seems like forever to hand sew a lining in one of my bags.
I had a thought, tried it, and it worked just fine. The thought came when I was hand sewing lining into a Fat Bottom Bag. I thought, "There's GOT to be an easier and faster way to do this! What would Mom do?" That's when the thought came to me. Mom would have used Freezer Paper and sew it on the machine!
The problem I had when trying to sew the lining with the machine before this was unfruitful. It came out horrid because the pressure foot kept tugging and catching on the crochet work I did and the thread would all bunch up making one hundred stitches in the same exact place - the work would not move forward.
All I had to do was put freezer paper between the pressure foot and the crochet work and TA DA! No more catching, bunching, and each stitch went exactly where it was supposed to, one right after the other in a neat line. Yea. Thanks Mom!
You'll need:
Freezer paper, or Parchment paper would work just the same
The fabric lining for your bag (or other crocheted item)
Your crocheted bag
A sewing machine
Several of you have asked about stitch length....
**Set your stitch length to one you would use for everyday, medium weight fabrics.** I haven't tried a zig zag stitch yet, nor have I tried a top stitch setting (where the machine makes a triple stitch) but I'd like to try and I'll let you know how it turns out.
Just put the paper next to the teeth that push the material along (for which I cannot remember the real name of at this moment! ack!) , under the presser foot. The place your work, with the fabric lining pinned into place, on top of the freezer paper, underneath the presser foot as well.
As long as you don't go off the fabric, don't stray onto the crocheted part of your work, this trick should work just fine.
Once the lining is sewed in, just remove the paper, one side at a time, tearing it carefully away from the machine stitching.
(I don't have an example shot just yet of this action because I didn't think to share this with you until I was all done with this bag but next one, if need be, I'll post the photo of actually pulling the paper away from the stitches. For now, this is what it looks like to pull the paper away from stitches I made in an hand towel. lol)
It's best to do one side and then the other to make sure you don't pull any stitches too hard and pull them out. Any little bits of paper that may stay stuck in the stitches of your work can easily be pulled out with your fingernails or tweezers, but I don't find that very many little bits are stubborn this way, they mostly come out when you pull the paper away.
That's It! I hope this made something easier and quicker for you. I do like the results of hand sewing my linings in my bags but when it comes to being cost effective for a boutique sale or craft fair, machine sewing is the only way to fly. We spend enough hours on our crocheting - my doctor figured out I get about 12 cents per hour for my crochet work at the prices I sell my items for. Save time, save money, save your fingers, save yourself. Use the machine whenever you can! ;-D
If you found this post to be useful, please indicate by leaving a comment below. Also, if you found it to be boring or dumb, please feel free to say so. I like to share my secrets but don't want to if I find out everyone already knows everything! lol
Do you have a question about crocheting or sewing that we can help answer for you? Is there something that's been on your mind that you've always wondered about either of the two? Let me know in the comment section below and I'll see what we can do to find the answer for you. Maybe it's something you just discovered yourself, put that in the comments too and I'll create a post for and by my readers that shares tips like this one (without the photos and extreme explanations). It would be nice to help each other by sharing our knowledge, don't you think? It'll be kind of like Heloise's book of household tips except it'll be this blog and about crocheting. We'll see. Maybe we could get together a book like that - I don't believe there is one out there. We'll see.
Gotta go!
Have a great day, God bless you!
Thursday, July 5, 2012
Crochet Pattern: Snapdragon Bag
Free Crochet Pattern:
Snapdragon Bag
by Cynthia J Luciene aka anitalite copyright July 5, 2012
Please link to this page to distribute this pattern. It may not be sold by you, however, you may sell whatever you make using this pattern.
With worsted weight yarn and a "J" size hook, ch 32
Round 1: sc in 3rd ch from hook and in each ch across, making a total of 5 sc in end ch, turn clockwise and working in the unused loops of beginning chs, sc in each ch across, work 4 sc in end ch and sl st to 1st sc to join. (38 sc total)
Round 2: ch 1, sc in each sc up to last two sc on same side. 2 sc in next-to-last and end sc (middle sc of 5 sc group from prev round) then still working in the round, sc in rem sc to last two. 2 sc in next-to-last and 2 sc in end sc as mentioned prev. sl st to 1st sc to join. (42 sc)
Rounds 3 and on: Continue same as Round 2 until there are 80 sc all the way around once.
(Continue to work in the round for the following rows:)
Round 6: ch 5, dc in same st as ch 3 (beg v-stitch made), *skip 2 st. 5 dc in next st (shell made), skip 2 st, v-stitch in next st; repeat from * around until last v-stitch then skip 2 st, shell in next, join to top of ch 3 with sl st to join.
Round 7: sl st into next ch 2 space (middle of v-st), ch 3, 4 dc in same ch 2 sp (beg shell made), *v-stitch in middle dc of next shell, shell in next v-st - continue around from * until last shell then v-st in middle dc of next shell, join with sl st to top of beg ch 3 to join.
Rounds 8 and on:
Continue following stitch pattern in order Rounds 6 and 7 until bag is desired size. (For the bag shown, 10 rounds of the snapdragon stitch pattern were used.)
Fasten off, weave in ends.
For Handles As Shown:
(Of course you can use any handle you prefer, I thought fancy cording would also work well with this bag, I just didn't happen to have any on hand.)
Attach (with a sl st leaving a long - 10 " tail) worsted weight yarn to either side where you'd like the handle to be placed. ch 3, dc in same stitch as ch 3, ch 2, 2 dc in SAME stitch. turn.
Row 2: sl st to ch 2 sp, ch 3, dc, ch 2, 2 dc in same ch2 sp; turn.
Rows 3 and on: repeat row 2 until desired length is achieved. If you want the open shells in the handle to all face upward instead of having one side of the handle with shell st up and then going down on the opposite side, just make your handle half as long as you really want it and then fasten off. Attach to opposite side in the manner stated at the beginning of handle instructions and follow the directions from there. When both sides of your handle are even just slip st together the ends that meet in the middle. I used a longer tail than I normally do so I'd have plenty of yarn to weave in, assuring the handle won't pull apart with weight inside the bag as it's being used.
Closure:
I simply attached the worsted weight yarn to the middle-est stitch of the bag and made a ch long enough to go around an old vintage button I had from one of my mother's old coats. Then I back-tracked on the ch with sc all the way to where I attached it. I did use a bit extra of a tail here too, to ensure it wouldn't unravel with use. This tail was about 10" long as well. (Probably a bit overkill but better safe than sorry, right?)
Hope the directions are okay. If you have any questions please comment below and I'll get back to you asap. Thanks and have a wonderful day and fun making this bag. I found it to work up quickly and the snapdragon stitch gives it a very fancy look without being a complicated stitch pattern. I am very happy with the results, are you?
God bless you and yours. God bless America
Monday, June 4, 2012
Crochet News: A Quick And Easy Idea For A Doily
Thanks to Craftgawker.com I found a blogsite called "These Are A Few Of My Favourite Things" and a post called "Quick And Easy". It is a short post but well deserving of your attention.
Olivia, the blog owner of Favourite Things posted an idea for using doilies that most of us have laying around or stashed in our linen cupboards. It's a simple yet very creative idea for displaying earrings!
Simply put a doily in a embroidery hoop that matches it's size (or better) . Olivia's doily looks like it fits in the hoop perfectly but mine did not but I like the effect anyway. It gave my earring hoop a lacy pretty edging:
I added ribbon to the outside of the hoop and tied the little bouquet of silk flowers to the top. That's it! So easy! This is really only suitable for the "hook" type of pierced earrings, I tried with other styles but it was a lot of trouble getting them on and off the doily without the whole thing crashing down. Maybe I'm just clumsy. ha ha.
Isn't that about the easiest, prettiest thing you ever saw? Thank you Olivia! Please follow the link to her post and leave a comment to tell her what you think!
Have a great day and God bless you and yours!
Wednesday, May 30, 2012
On The Crochet Menu: Another FBB
What's on the crochet menu today? Another FBB (Fat Bottom Bag), one I hope to sell very soon. Many ladies are presenting a great interest in the bags since my friend - who goes to the hospital for treatments for Lupus - brought her FBB I made her to the hospital and the nurses there saw it and wanted to see more of them. The nurses told my friend they would like to have a FBB like hers, proving my point in my previous post that word of mouth is the best method of advertising.
Here's the latest addition to my FBB inventory (below) and following this post is a quick (and easy) photo tutorial on how I made the handles for it. Let me know what you think in the comments below, your comments are always welcome!
I made the flowers and leaves using size 3 crochet thread and a size 3 steel crochet hook. I tend to like the thread flowers better than worsted weight but it really depends on each individual bag that I make. Each one has a personality of its own.
By luck the lining I chose matches the thread I used for the flowers perfectly. The purples and blues are really pretty against the black body of the bag. I found this material at Jo Ann's in the designer area of the fabric section.
I was disappointed in the handles at Jo Ann's that day and was shocked at the prices of them. They've gone up quite a bit and my little cheapy stand by handle - the unfinished rattan round handles that were $2.99 are no longer available there. Only the finished rattan handles were there and priced at $5.99! I wasn't about to pay that much for a rattan handle so I decided to follow my boyfriend's suggestion, to look for cords or braids in the trims section and make my own handles. Below is what I did to make a 3/8" cording work as handles for this bag. If anyone has any better ideas about how to make handles, please do comment below! Anyway, here's what I did:
Before cutting your twisted cording wrap scotch tape around the ends and cut in the middle of the tape so both ends of the cut are held in place and will not ravel. I only purchased one yard of this cording for the handles at a couple bucks a yard. I cut the cording in half and used half a yard for each handle.
To ensure the cording won't ravel, apply a good amount of glue to all ends and allow to dry well on waxed paper.
This will also make a barrier so when you sew the ends together the stitches won't pull through and come apart.
In a zig-zag pattern, using heavy duty thread and needle, sew the ends together. Go all the way around the cording with your stitches so it doesn't wiggle with a gap or bend funny. You won't be able to get the needle through the glue you applied earlier so just stitch on the other side of the glue barrier. I enlarged the photo so you'd be able to see how I made the stitches for this. It doesn't look very pretty but it serves a good purpose and it won't be seen when the bag is put altogether.
To make sure the corded handles didn't slip around while being used, exposing the ends stitched together, I tacked the stitched part of the handles to the bag's handle flaps smack dab in the middle of the flap.
Now all that's left is to secure your handle flaps over the handles and you're done.
Please leave feedback in the comments below. I appreciate your views and suggestions and conversation more than you know. Thanks for stopping by, I hope I at least inspired you to make something beautiful today.
God bless you and God bless America - One Nation Under God... United we stand, divided we fall.
Ronald Regan said, "If we forget we are a nation under God, we'll be a nation gone under".
Here's the latest addition to my FBB inventory (below) and following this post is a quick (and easy) photo tutorial on how I made the handles for it. Let me know what you think in the comments below, your comments are always welcome!
I made the flowers and leaves using size 3 crochet thread and a size 3 steel crochet hook. I tend to like the thread flowers better than worsted weight but it really depends on each individual bag that I make. Each one has a personality of its own.
I was disappointed in the handles at Jo Ann's that day and was shocked at the prices of them. They've gone up quite a bit and my little cheapy stand by handle - the unfinished rattan round handles that were $2.99 are no longer available there. Only the finished rattan handles were there and priced at $5.99! I wasn't about to pay that much for a rattan handle so I decided to follow my boyfriend's suggestion, to look for cords or braids in the trims section and make my own handles. Below is what I did to make a 3/8" cording work as handles for this bag. If anyone has any better ideas about how to make handles, please do comment below! Anyway, here's what I did:
Before cutting your twisted cording wrap scotch tape around the ends and cut in the middle of the tape so both ends of the cut are held in place and will not ravel. I only purchased one yard of this cording for the handles at a couple bucks a yard. I cut the cording in half and used half a yard for each handle.
To ensure the cording won't ravel, apply a good amount of glue to all ends and allow to dry well on waxed paper.
This will also make a barrier so when you sew the ends together the stitches won't pull through and come apart.
In a zig-zag pattern, using heavy duty thread and needle, sew the ends together. Go all the way around the cording with your stitches so it doesn't wiggle with a gap or bend funny. You won't be able to get the needle through the glue you applied earlier so just stitch on the other side of the glue barrier. I enlarged the photo so you'd be able to see how I made the stitches for this. It doesn't look very pretty but it serves a good purpose and it won't be seen when the bag is put altogether.
To make sure the corded handles didn't slip around while being used, exposing the ends stitched together, I tacked the stitched part of the handles to the bag's handle flaps smack dab in the middle of the flap.
Now all that's left is to secure your handle flaps over the handles and you're done.
Please leave feedback in the comments below. I appreciate your views and suggestions and conversation more than you know. Thanks for stopping by, I hope I at least inspired you to make something beautiful today.
God bless you and God bless America - One Nation Under God... United we stand, divided we fall.
Ronald Regan said, "If we forget we are a nation under God, we'll be a nation gone under".
Sunday, May 6, 2012
Crochet Pattern: Grandma Rupp's Drawstring Ditty Bag For Little Girls
My Dad's mother, Luella Rupp, born in Louisiana, moved to Los Angeles and died here at the age of 89, was a craftsy gal. She did everything from making felt lady bug refrigerator magnets, parrot earrings out of tiny little colored shells, to crocheting rope necklaces and button bracelets with tiny beads and antique buttons. She also crocheted other things, like this cute little drawstring bag that she gave me when I was verrrry young, about 5 years old. That makes this little bag almost 50 years old. Wow. It's pre-antique. Holy crap! That makes ME, well, never mind!!!!
Please note pattern correction, make 12 motifs, not 20.
Thank you Kathy.
This little bag is simple enough for any beginner to make so here ya go, the pattern below:
Start with worsted weight (4) of white (or any color for main color A) and an F hook:
BOTTOM:
ch 5, join to first ch with a slip stitch to form ring
Round 1: ch 3 (does not count as a dc) Make 10 dc inside ring, ch 3,
Round 2: 2 dc in each dc around, (20 dc) until you reach ch 3, then ch 3,
Round 3: (2 dc in next dc, 1 dc in next) around until you reach the ch 3, then ch 3,
Round 4: (2 dc in next dc, 1 dc in next 2 dc) around until you reach the ch 3, then ch 3,
Round 5: (2 dc in next dc, 1 dc in next 3 dc) around until you reach the ch 3 and then join to top of ch 3 with a sl st. Finish off, weave in ends.
MOTIFS FOR BODY:
(make 12) <----note been="" br="" corrected="" has="" nbsp="" this="">----note>
With color of your choice as long as it's a worsted weight (4) for "flower middle", and using "F" hook,
ch 5, join with sl st to form ring,
Round 1: (working inside ring:) ch 3 (counts as first dc) 2dc, (ch 3, 3dc ) three times, ch 3, join to top of beg ch 3 with sl st. Fasten off, weave in ends.
Attach green worsted weight (4) with sl st in any ch 3 space for "leaves" and still using "F" hook,
((ch 3 (counts as dc) 2dc, ch 3, 3dc )) all in same ch 3 space, ch 1, **(3 dc, ch 3, 3 dc) all in next ch 3 sp, ch 1, repeat from **two more times. attach to top of beg ch 3 with sl st. Fasten off, weave in ends.
Attach Main color A (white) in a corner ch 3 space with a sl st:
ch 3 (counts as a dc), 2dc, ch 3, 3dc all in same ch 3 space. ch 1, ** 3 dc in next ch 1 sp, ch 1, (3dc, ch 3, 3dc) all in same ch 3 space (corner), ch 1; repeat from ** around, 3 dc in last ch 1 sp, ch 1, join to top of beg ch 3 with sl st.
Fasten off, weave in ends.
JOIN MOTIFS
Lay motifs in two rows of six. Join motifs using main color, yarn needle, with whip stitch. Using whip stitch, join motifs at ends to form a cynlinder. Join bottom of bag to bottom row of motifs using whip stitch.
Weave in ends.
RUFFLE TOP
Join main color (white) to any stitch at top of bag. Ch 3, 2 dc in same stitch, **dc in next 2 stitches, 3 dc in next stitch; repeat from ** around, join to top of beg ch 3 with sl st. Fasten off, weave in ends.
DRAWSTRING
Using chain stitch, make two lengths of drawstring measuring 2 feet each. Weave chained drawstring into top of bag with your hook or a large safety pin. Tie ends of first drawstring together about three inches from ends and fray the ends to make a tassle effect.
Do the same with the second drawstring so that when you pull on each drawstring, the bag gathers up and closes.
All done! Isn't that just the cutest little ditty bag you've ever seen? I have cherished mine through the years, having gotten it from Grandma Rupp when I was so young. I used to carry it to church with me as a child. Now I am going to pass it down to my grand daughter who is just the right age to have one of these. It's a pretty little bag that can be passed down generation to generation that doesn't take a long time to put together.
Thursday, May 3, 2012
Crochet Pattern: Beaded Scallop Earrings
Here's a free crochet pattern for my beaded scallop earrings. It's been a while since I've made jewelry with thread and beads, this pattern is very easy and satisfying. You can whip up a pair of these earrings in an hour or less! I've gotten lots of compliments on them, I'm sure you will too. They'd also make a great gift for a special friend, just because.
Instructions
...On my jewelry tree, they fit right in. ;-)
Note: My laptop got dropped ;-( and the screen broke so I'm not able to make a PDF file for this pattern as yet. I ordered a laptop this morning and ought to be getting it very soon in which case I'll make a PDF file for easy printing, without all the gobbly-goop photos to soak up your printer ink. ;-)
by Cynthia J Luciene copyright April 2012
You may share this pattern freely using the link to this post, and you may sell anything you make using this pattern. You may not, however, sell this pattern in any way or form. Thank you for respecting the copyright and for giving credit where credit is due.
Materials:
Remnant of crochet thread size 10; two yards per earring should be plenty
7 small crystals or beads,
1 larger bead or crystal (see photos)
1 pair of hoop earrings, approximately 1 1/8" in diameter
Size 6 steel crochet hook
Instructions
(Note: for help "casting" onto hoop earring with a sc, please see tutorial HERE. There is a photo tutorial at the bottom of the post at that link).
Before beginning, thread beads or crystals onto size 10 crochet thread in the following order, for each earring:
5 small, 1 large, 2 small repeat this order for the second earring. Now you have a total of 16 beads or crystals strung onto thread.
Begin: "Cast onto" hoop beginning with a slip stitch. (see the tutorial mentioned in Note: above)
Row 1: 12 sc onto hoop;
Row 2: ch 1 turn, working into front loops only, sl st into first sc, Beaded HDC in next, sl st in next, HDC in next, dc, in next (beaded TRC, beaded picot, beaded TRC) all in next st, dc in next, HDC in next, sl st in next, beaded HDC in next, slip stitch in rem st.
Row 3: TURN, ch 3, beaded ch, ch 3, sc into next dc (just before beaded trc), ch 6, beaded ch, ch 6, sc into next dc (just after second beaded trc), ch 3, beaded ch, ch 3, sl st into last st of row 2.
Row 4: ch 1, turn; 4sc, ch 3 past bead, 4 sc on other side of bead (all in the ch 3-beaded ch-ch3 loop); in next ch sp: 2 sc, picot, 5 sc before next bead, ch 3 over bead, 5 sc, picot, 2 sc in ch sp after bead; 4 sc in ch sp before next bead, ch 3 over bead, 4 sc in ch sp after bead. Join to Row 3 with sl st.
Fasten off weave in ends, repeat for second earring NOTE when making second earring, hold hoop in opposite direction you held your hoop the first time so you'll have one earring for each ear and not two right earrings two lefties - OR you can just pop the crystals or beads through to the other side, it's real easy to do that.
...On my jewelry tree, they fit right in. ;-)
Note: My laptop got dropped ;-( and the screen broke so I'm not able to make a PDF file for this pattern as yet. I ordered a laptop this morning and ought to be getting it very soon in which case I'll make a PDF file for easy printing, without all the gobbly-goop photos to soak up your printer ink. ;-)
Friday, April 13, 2012
Crochet News: Well, Kinda - Bag Handles Tutorial
This is only "kinda" crochet news because it's not really about crocheting but it involves something you might need when you crochet something: Bag Handles! They are no longer found at Michael's (the one by my home doesn't carry them anymore, does yours?) and I have relatively no other craft store local to me besides Joann's Craft and Fabric Store. I'm sure you're very familiar with that one, it's a rather large chain. Even so, I have to travel quite a distance to get to Joann's to purchase handles I use for the FBBs I make (Fat Bottom Bags found in Stitch N Bitch Crochet).
There are many different types of bag handles to choose from that give the bag you're making a character of it's own. Well, these handles are wonderful but they are also expensive ranging anywhere from a couple of dollars (for the unfinished rattan round handles) to over $8.00 for the fancier handles made of finished wood or leather, or acrylic.
In making my bags I have found it fun (and cheap! $$$) to make my own handles using the unfinished rattan handles at about $2.99 per pair:
To make the handles special for each bag I either use a single crochet onto the handle as I did for my Toasty FBB found HERE.
OR
I cover the handles with material that matches the lining I'm using for the bag as I did below:
Below is a brief tutorial on how to cover the rattan round handles found at Joann's...
(It's easy-peasy!)
1. Separate the handle where the joint is. You'll have to use a flat head screw driver or something similar to loosen it first because it is glued together. There is also a nail driven into the handle which you'll pull out of ONE side of the handle:
(Be careful not to poke yourself with the nail, it may try to spring back into the hole it came out of.)
2. Cut a strip of material that matches your lining for each handle (2): Make the strip 2 1/8" wide and approximately 3 feet long. (really!) If you don't like the bunched up look and want it smoother than that you can always cut your strip of material shorter. I just rolled the handle down the strip of material twice to figure how long to make it bunchy.
3. Sew the strip lengthwise, right sides together, using the presser foot as a guide for your seam allowance (guide the edge of the material along the edge of the presser foot so your seam will be approximately 1/4" wide) . If your seam allowance is too big it will be hard to get the material over the handle.
4. Attach a large safety pin to one end of the sewn strip and push the safety pin inside your strip to turn it right side out. Just keep pushing and gathering and pushing and gathering until you reach the end. It's a long tedious process but it's worth the results you get:
This photo shows what it looks like when you've got the strip half way turned out. It does get easier from here. Don't try to push too much fabric down at once - it'll get all bunched up and be a real pain to push down.
(If you want me to show photos of this process in more detail please leave your request in comments below. ;-)
5. Now that you have your strip turned right side out, just slide it over the side of the handle that does not have the nail in it. (Again, be careful of that nail.)
(Sliding material over side of handle without nail)
6. Now that the entire strip is bunched up on the handle you want to turn in the ends so there aren't any raw edges showing and take a few stitches in it just to keep it securely in place. This is the part of the handle that would go inside the handle flap of the bag.
That's it, no biggie, easy-peasy right? Makes a great looking handle for your FBB or any other bag you make...
This is a bag I just finished that was ordered from me by a friend on Ravelry. If you'd like to order a bag like this, please contact me HERE Each bag is unique and if you'd like to see more like this check out my other posts or Anitalite on Ravelry.com.
Saturday, March 31, 2012
Crochet Update: Mandala Throw: Finished!
For the past couple of weeks I've been working on the Blue Mandala Throw by Sharon Mullett Bowlsby as found in Crochet World magazine June 2011 issue. (The link will open in a new window and is the link that will allow you to purchase the back issue of Crochet World magazine for $5.99). The issue has many wonderful patterns in it so the purchase price of $5.99 is well worth the price and the link has a PDF download option so you can get your issue immediately upon purchase which I find not only convenient but necessary! I just hate having to wait for something to come in the mail, don't you? lol
Here's a photo of what the pattern's throw looks like:
I enjoyed working this pattern because I didn't have to keep referring back to the pattern for each round - once the initial round was done I could do the following rounds in the set on my own until the next set of rounds came due, so rounds 5-25 were done on my own (without the pattern in my hand!) and then rounds 28-50 the same way, without the pattern right in front of me. It made the project go along real easily and also easy to carry around with me wherever I went with it. Being a throw, not as big as an afghan, made it okay to bring along as well.
Here's some shots of my project from beginning to end. I used Premier Everyday Soft Worsted for mine because of it's anti-piling, softness, and beautiful color combinations. My little Chihuahua Baby wouldn't get off the throw for me to take photos so he's in some of them, the little stinker. lol.
Moving right along, rounds 5-25 coming along nicely. It started to bunch up though, like there were too many stitches in the rounds but it all worked out nicely in the end so if you work the pattern just keep on keeping on in spite of the bunching. You'll like the results in the end.
Just beginning rounds 28-50 now, the bunching has started to "mellow out" and the star is coming together. I love the way this ombre yarn colors are patterned out in this project. Seeing it in person really is best though, the camera (the camera operator!) doesn't do it justice.
Just a bird's eye view of the same stage in the pattern as the one above...
Finally, my finished Mandala throw! I love it, and can't wait to give it to my sister tomorrow. Green is her favorite color and this has plenty of green in it as well as my favorite color, pink, in a subtle way as if to say we are always together.
The border was a bit tricky at first but after I figured it out and corrected a few mistakes in the written pattern, I didn't have any trouble with it. It's an unusual border that I would like to add to another afghan or even washcloth of my own someday. For pattern correction, please see my notes on Ravelry.com for this project. (link will take you to my project page on Ravelry)
Well, that's it! What do you think? It's the first afghan/throw that didn't take me more than a year to finish! lol. (Note my son's afghan took me 12 years to finish!!! lol)
Okaaaaayyy!!! One more photo of my throw and my ham bone puppy dog! Ha ha ha. Couldn't help myself.
Here's a photo of what the pattern's throw looks like:
I enjoyed working this pattern because I didn't have to keep referring back to the pattern for each round - once the initial round was done I could do the following rounds in the set on my own until the next set of rounds came due, so rounds 5-25 were done on my own (without the pattern in my hand!) and then rounds 28-50 the same way, without the pattern right in front of me. It made the project go along real easily and also easy to carry around with me wherever I went with it. Being a throw, not as big as an afghan, made it okay to bring along as well.
Here's some shots of my project from beginning to end. I used Premier Everyday Soft Worsted for mine because of it's anti-piling, softness, and beautiful color combinations. My little Chihuahua Baby wouldn't get off the throw for me to take photos so he's in some of them, the little stinker. lol.
| Why this is sideways I have no freaking clue! lol | This color yarn is called Mint Chocolate Chip, YUM! It's got lovely pink, brown, and greens in it. |
Moving right along, rounds 5-25 coming along nicely. It started to bunch up though, like there were too many stitches in the rounds but it all worked out nicely in the end so if you work the pattern just keep on keeping on in spite of the bunching. You'll like the results in the end.
Just beginning rounds 28-50 now, the bunching has started to "mellow out" and the star is coming together. I love the way this ombre yarn colors are patterned out in this project. Seeing it in person really is best though, the camera (the camera operator!) doesn't do it justice.
Just a bird's eye view of the same stage in the pattern as the one above...
Finally, my finished Mandala throw! I love it, and can't wait to give it to my sister tomorrow. Green is her favorite color and this has plenty of green in it as well as my favorite color, pink, in a subtle way as if to say we are always together.
The border was a bit tricky at first but after I figured it out and corrected a few mistakes in the written pattern, I didn't have any trouble with it. It's an unusual border that I would like to add to another afghan or even washcloth of my own someday. For pattern correction, please see my notes on Ravelry.com for this project. (link will take you to my project page on Ravelry)
Well, that's it! What do you think? It's the first afghan/throw that didn't take me more than a year to finish! lol. (Note my son's afghan took me 12 years to finish!!! lol)
Okaaaaayyy!!! One more photo of my throw and my ham bone puppy dog! Ha ha ha. Couldn't help myself.
Tuesday, January 31, 2012
Crochet Motifs: Putting It All Together
- If a man empties his purse into his head no one can take it away from him. An investment in knowledge always pays the best interest.
- Benjamin Franklin US author, diplomat, inventor, physicist, politician, & printer (1706 - 1790)
I've always wanted to crochet a top or skirt or handbag using motifs so I picked a motif pattern from a Japanese book I have called 300 crochet motif, edging. I thought "This is going to be fun and easy and is going to look gorgeous." An investment in knowledge would have been the better way to go, but not me. I think I know what I'm doing. Ha.
Let me tell you, it's not as easy as it looks! Making the motifs was easy enough and went along quickly. As soon as I had enough - or what I thought was enough - motifs to make a handbag with, I started sewing them together.
This is what I ended up with because I didn't have a good plan in mind to begin with....
I mean, YIKES! So I went on a search on the internet to see if I could find a pattern for putting all these together without having to ruin what I've already started....
I found several patterns that would accommodate what I already had laid out and sewn together...
This one looks very similar to what I had going so I'm working on following the lay out that was pictured on this blog:
Stitch And Chat.
I've learned a lesson by all this, that I can't just crochet and expect everything to turn out easily. I have to have a plan in mind besides just picturing something in my head. I think in the future I'll make paper motifs and put them together first, making a pattern outline for my crocheted motifs. Taking out the stitching after motifs were already sewn together was very difficult and nerve wracking. I was fearful I would cut the wrong thread of yarn and ruin a motif or two. A few times I pulled on the wrong loop when trying to take out a stitch and had to work the yarn back into the motif so it wouldn't hang like a dead leaf about to fall off a tree.
I'm going to finish this bag, even if it kills me and it might do just that. lol. It's been a headache but once I'm done with this one I'll be able to make the next one (for my daughter) in no time at all. I found crocheting the motifs was fun and easy and went along very quickly. I'm really looking forward to the next motif bag because I know what I need to do now. **take the time to check a pattern before just sewing motifs together and hoping I'm doing it right** duh.
Will post the finished product as soon as I'm done (which at this rate could be in a year or so! lol)
Thursday, January 19, 2012
Crochet Tutorial: Seed Stitch
In an earlier post I mentioned the Soft Seed Stitch Scarf and Hat pattern and thought I would post a quick photo tutorial for the seed stitch for you.
After working a round of making stitches in the BLO (back loop only) of previous row :
sc in first st, dc in unused loop of next stitch:
This photo shows how the unused loop of the stitch from the previous row lines up with the stitch above which you leave unworked. You only work the dc into the bottom loop as shown below (hopefully)
Red arrows indicate where a dc is worked. An "X" is where you do not work a stitch. The white arrows show where the sc is worked. Hopefully this helps. Here's a few more photos that may help you see how it's supposed to look and one showing the dc pulled forward to skip a stitch and sc in the next.. (You skip the stitch that the dc would have been made in if you were working in that same row.)
Above the photo shows end of hook pointing to the unused loop of stitch of previous row (between two dcs) - the loop where the dc will be worked.
Photo above shows the dc just worked pulled forward (at the asterisk), exposing the stitch that you will skip and working the sc in the next stitch.
I hope this helps and does not confuse!
Good luck and have fun!
Subscribe to:
Posts (Atom)


